基于 Redis 实现关注关系
在掘金、知乎、抖音等平台,我们可以关注其他用户,其他用户也可以关注我们,而且如果彼此关注,会标出共同关注:
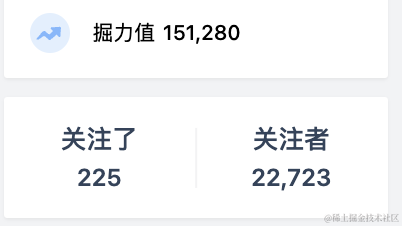

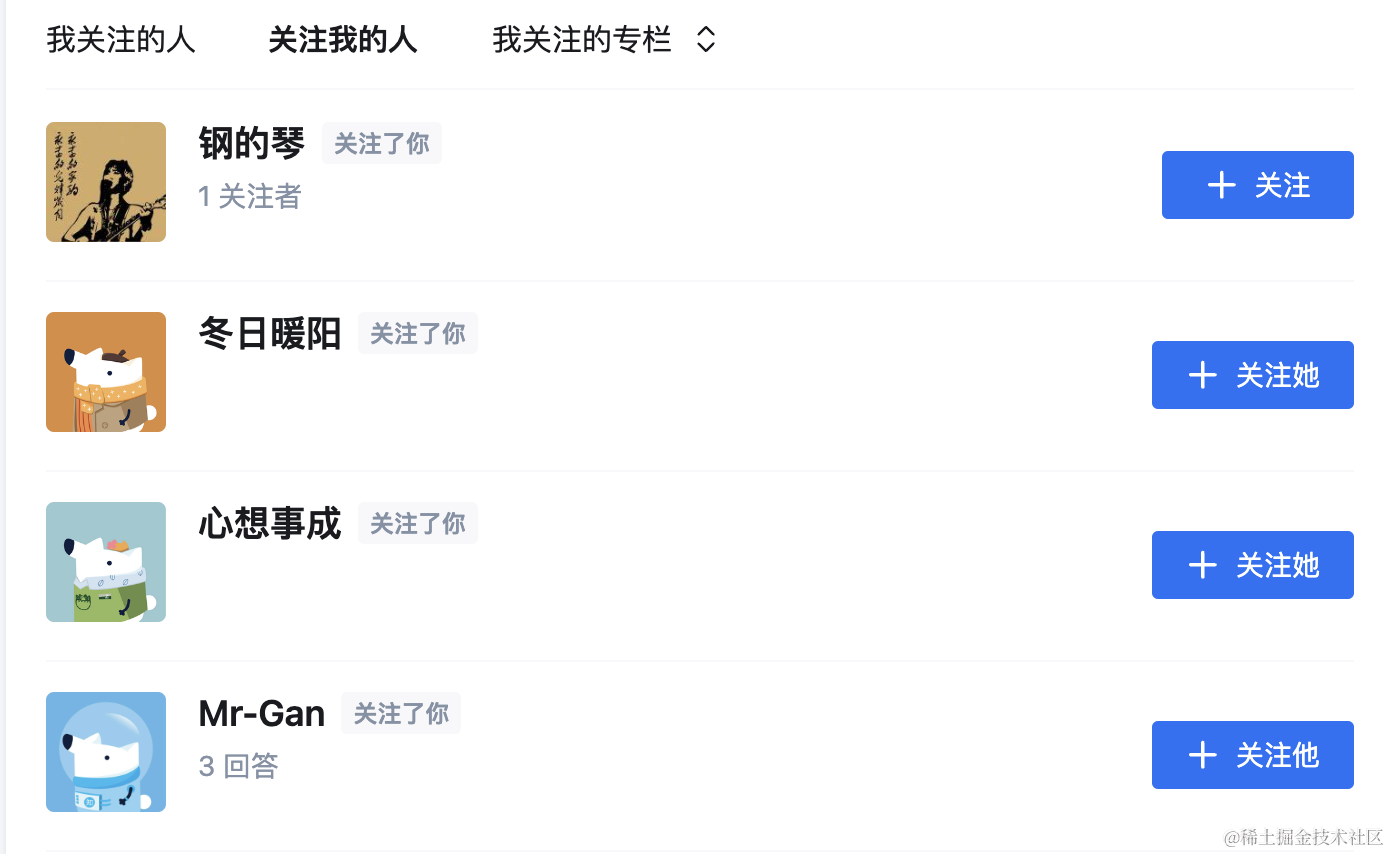
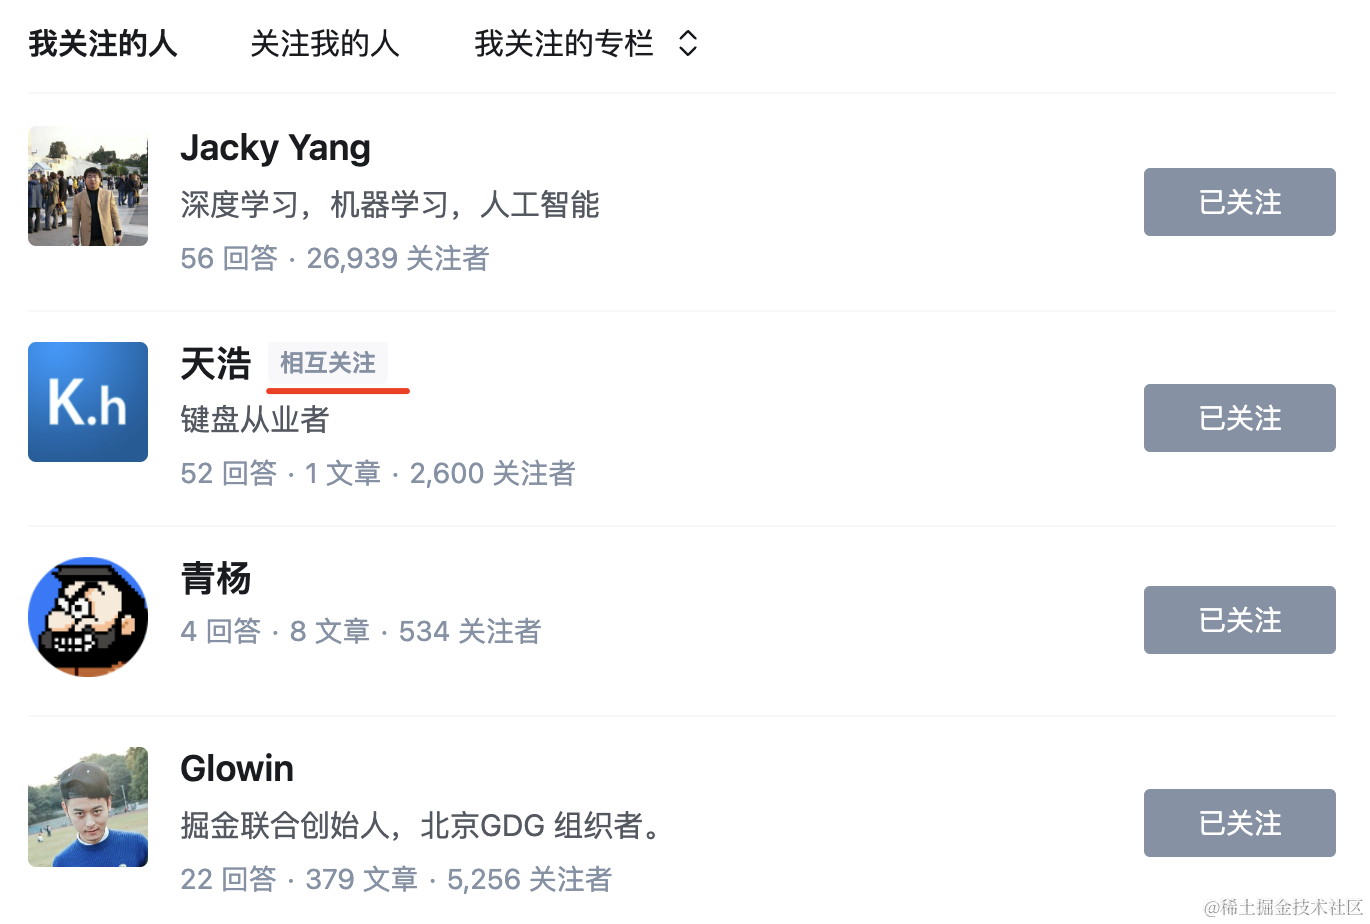
这种关注、被关注,相互关注,我们每天都能见到。
那它是怎么实现的呢?
一般是用 redis 的 Set 实现的。
Set 是集合,有很多命令:
SADD:添加元素
SMEMBERS:查看所有元素
SISMEMBER:某个 key 是否在集合中
SCARD:集合中某个 key 的元素数量
SMOVE:移动元素从一个集合到另一个集合
SDIFF:两个集合的差集
SINTER:两个集合的交集
SUNION:两个集合的并集
SINTERSTORE:两个集合的交集,存入新集合
SUNIONSTORE:两个集合的并集,存入新集合
SDIFFSTORE:两个集合的差集,存入新集合
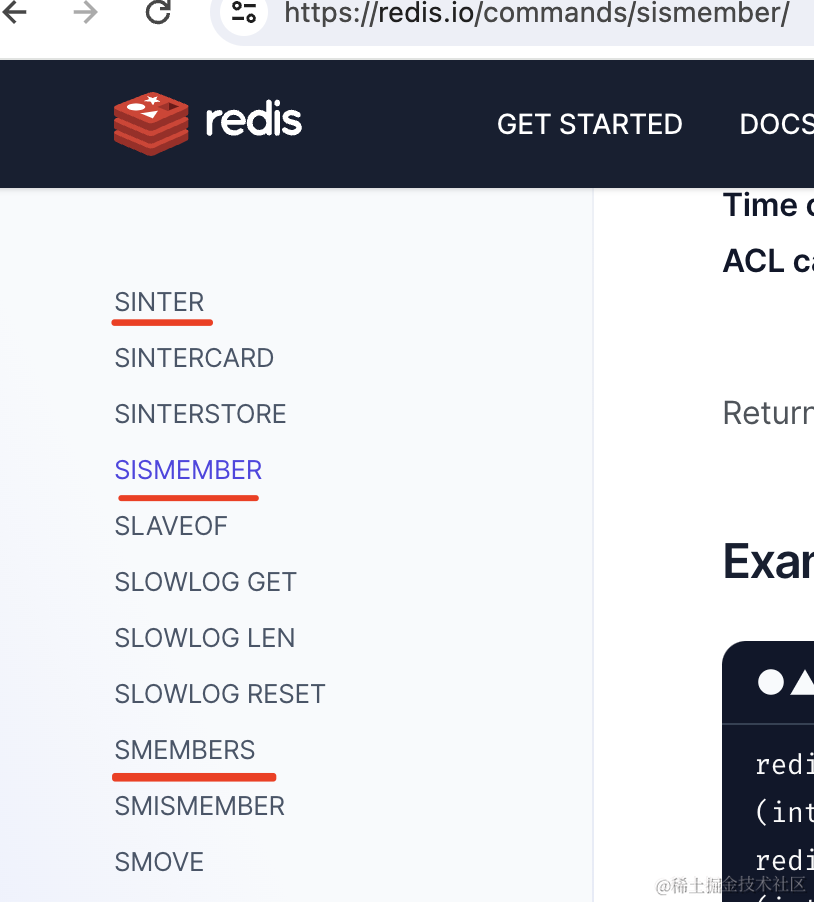
更多命令可以在 redis 文档中搜索以 S 开头的:
关注关系用 redis 来实现就是这样的:
比如张三 的 userId 是 1
那我们用一个 set 来存储它的关注者 followers:1
比如其中有 2、3、4 三个用户
然后用一个集合来存储他关注的人 following:1
其中有 2、5、6 三个用户
那相互关注的人就是 followers:1 和 following:1 的交集 SINTERSTORE 的结果,存入新集合,比如叫 follow-each-other:1

然后返回关注者或者关注的人的时候,用 SISMEMBER 判断下用户是否在 follow-each-other:1 这个集合中,是的话就可以标记出互相关注。
思路理清了,我们来写下代码。
安装 TypeORM 的包:
npm install --save @nestjs/typeorm typeorm mysql2
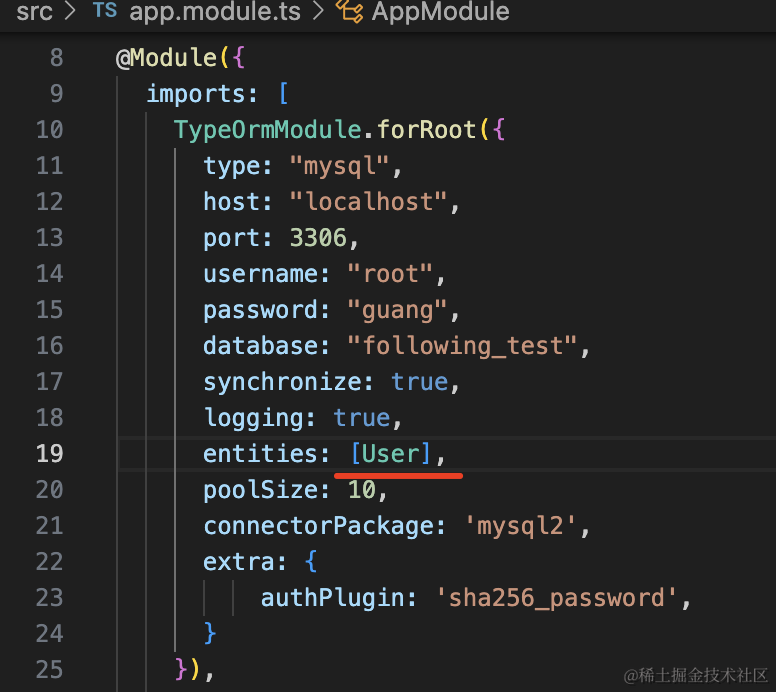
在 app.module.ts 引入下 TypeOrmModule:
import { Module } from "@nestjs/common";
import { AppController } from "./app.controller";
import { AppService } from "./app.service";
import { TypeOrmModule } from "@nestjs/typeorm";

@Module({
    imports: [
        TypeOrmModule.forRoot({
            type: "mysql",
            host: "localhost",
            port: 3306,
            username: "root",
            password: "guang",
            database: "following_test",
            synchronize: true,
            logging: true,
            entities: [],
            poolSize: 10,
            connectorPackage: "mysql2",
            extra: {
                authPlugin: "sha256_password",
            },
        }),
    ],
    controllers: [AppController],
    providers: [AppService],
})
export class AppModule {}
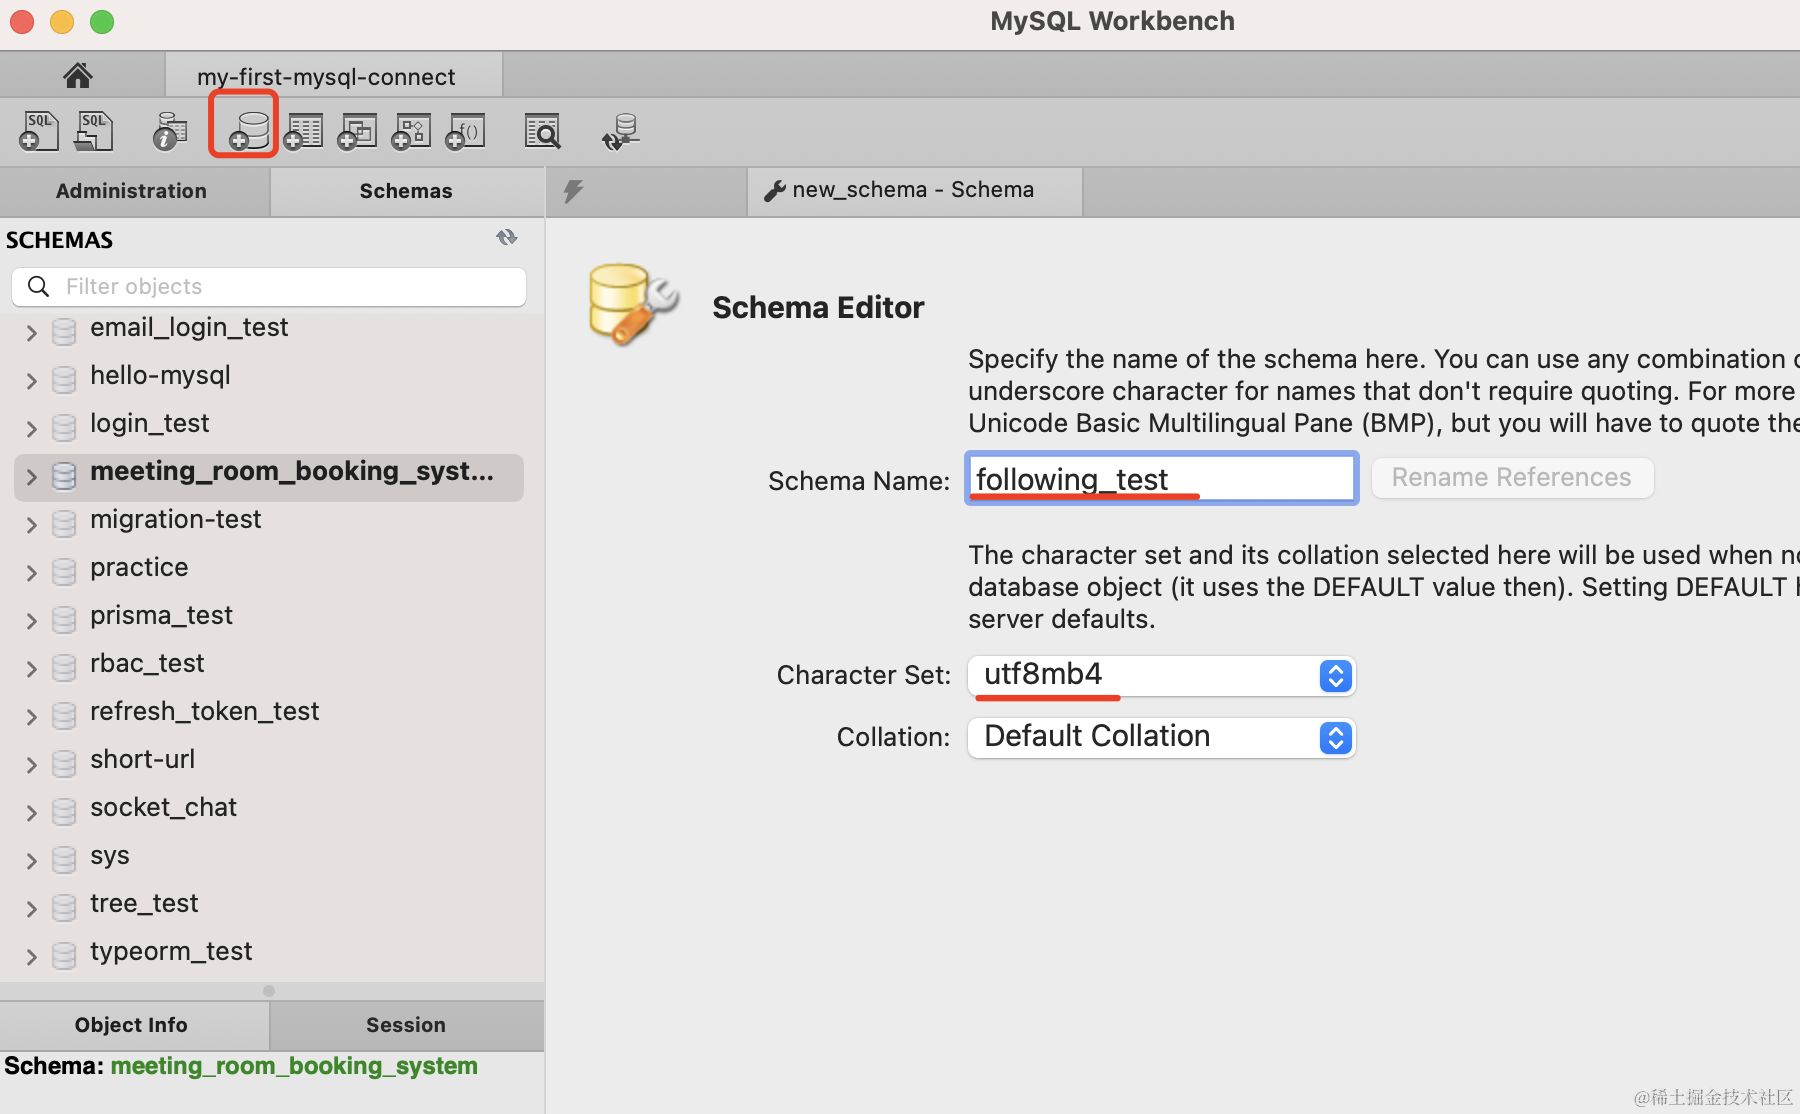
在 mysql workbench 里创建 following_test 数据库:
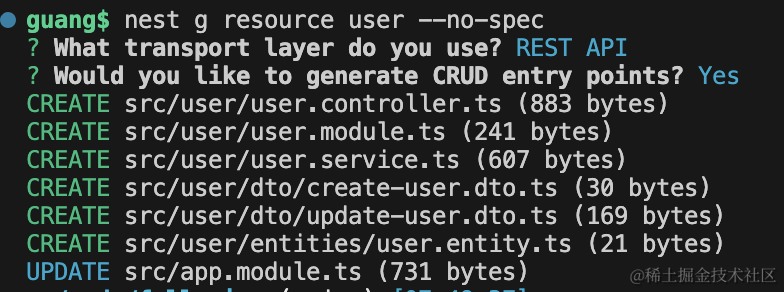
新建一个 user 模块:
nest g resource user --no-spec
改下 user.entity.ts
import {
    Column,
    Entity,
    JoinTable,
    ManyToMany,
    PrimaryGeneratedColumn,
} from "typeorm";

@Entity()
export class User {
    @PrimaryGeneratedColumn()
    id: number;

    @Column()
    name: string;

    @ManyToMany(() => User, (user) => user.following)
    @JoinTable()
    followers: User[];

    @ManyToMany(() => User, (user) => user.followers)
    following: User[];
}
这里用户和用户是多对多的关系,因为用户可以关注多个用户,用户也可以被多个用户关注。
所以用 @ManyToMany 还有 @JoinTable 来声明。
在 entities 引入这个 User:
把开发服务跑起来:
npm run start:dev
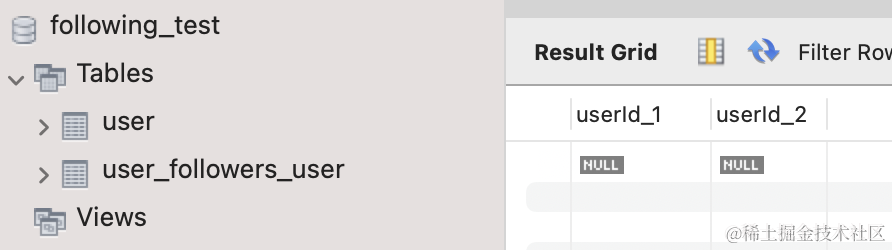
在 mysql workbench 里可以看到 user 表和 user_followers_user 中间表

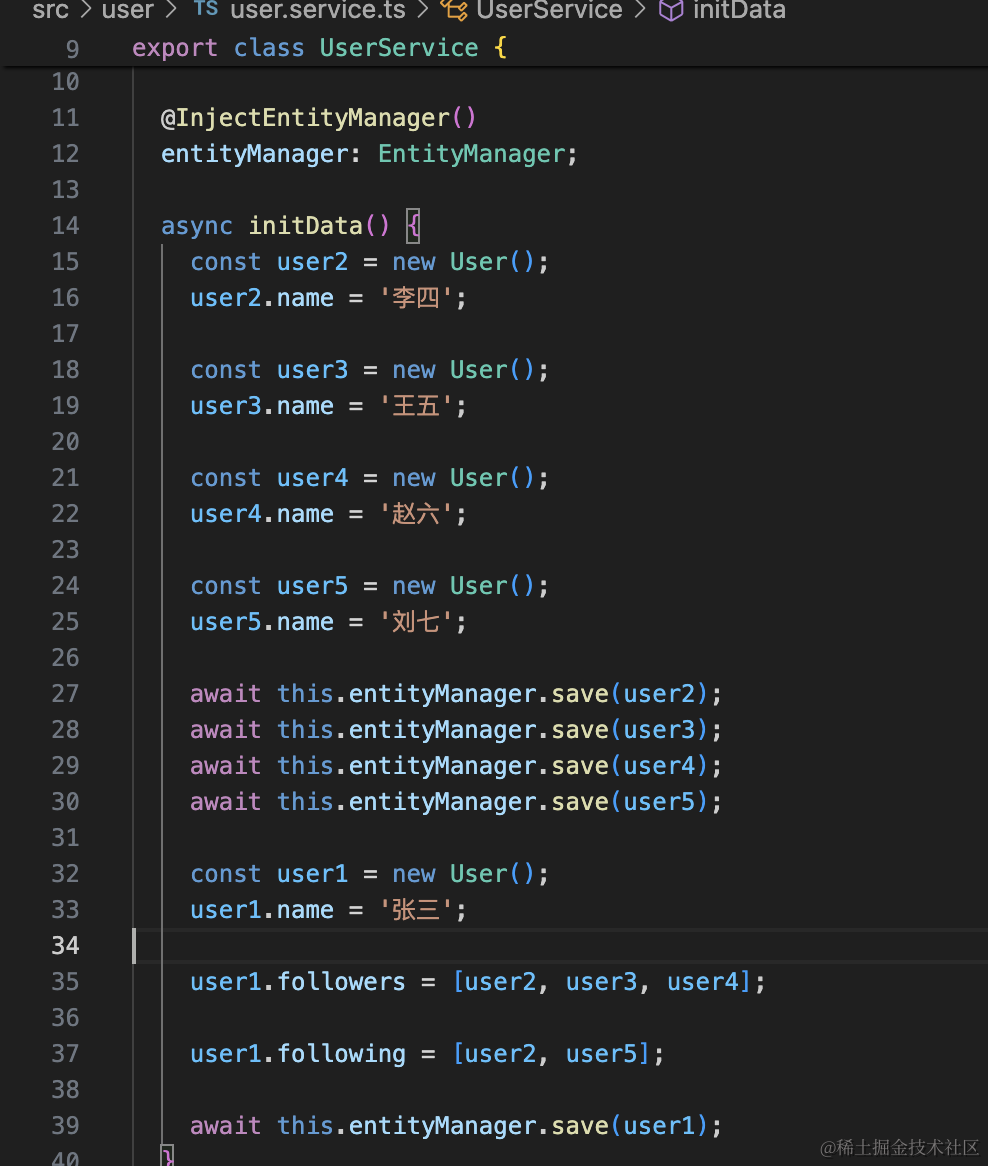
我们在 UserService 添加一个初始化数据的方法:
@InjectEntityManager()
entityManager: EntityManager;

async initData() {
    const user2 = new User();
    user2.name = '李四';

    const user3 = new User();
    user3.name = '王五';

    const user4 = new User();
    user4.name = '赵六';

    const user5 = new User();
    user5.name = '刘七';

    await this.entityManager.save(user2);
    await this.entityManager.save(user3);
    await this.entityManager.save(user4);
    await this.entityManager.save(user5);

    const user1 = new User();
    user1.name = '张三';

    user1.followers = [user2, user3, user4];

    user1.following = [user2, user5];

    await this.entityManager.save(user1);
}
在 UserController 里添加一个路由:
@Get('init')
async init() {
    await this.userService.initData();
    return 'done'
}
浏览器访问下:
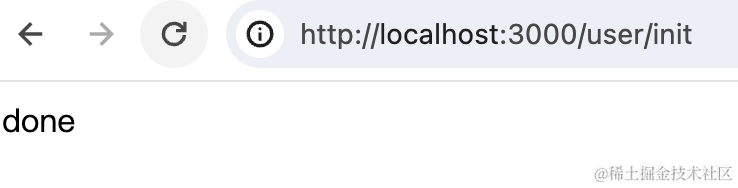
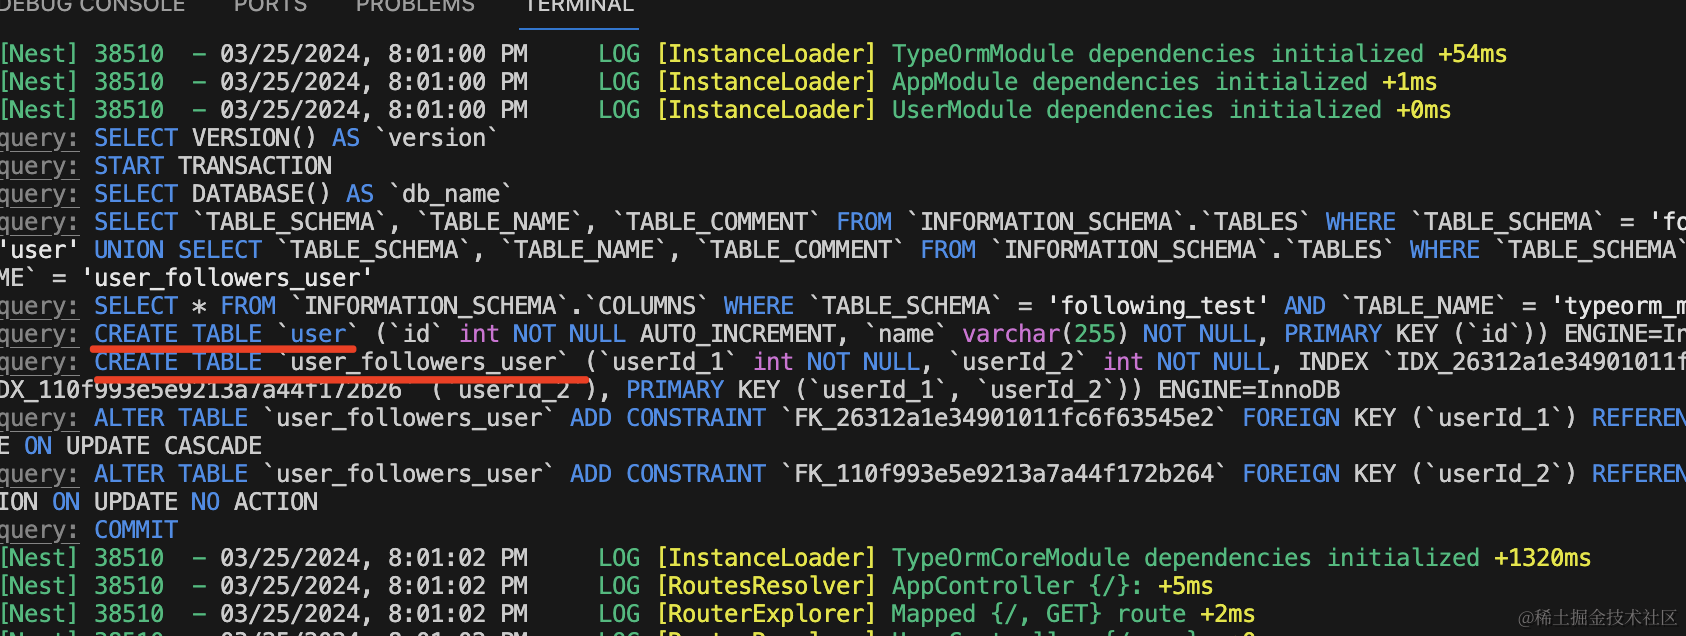
打印了 6 条 sql 语句:
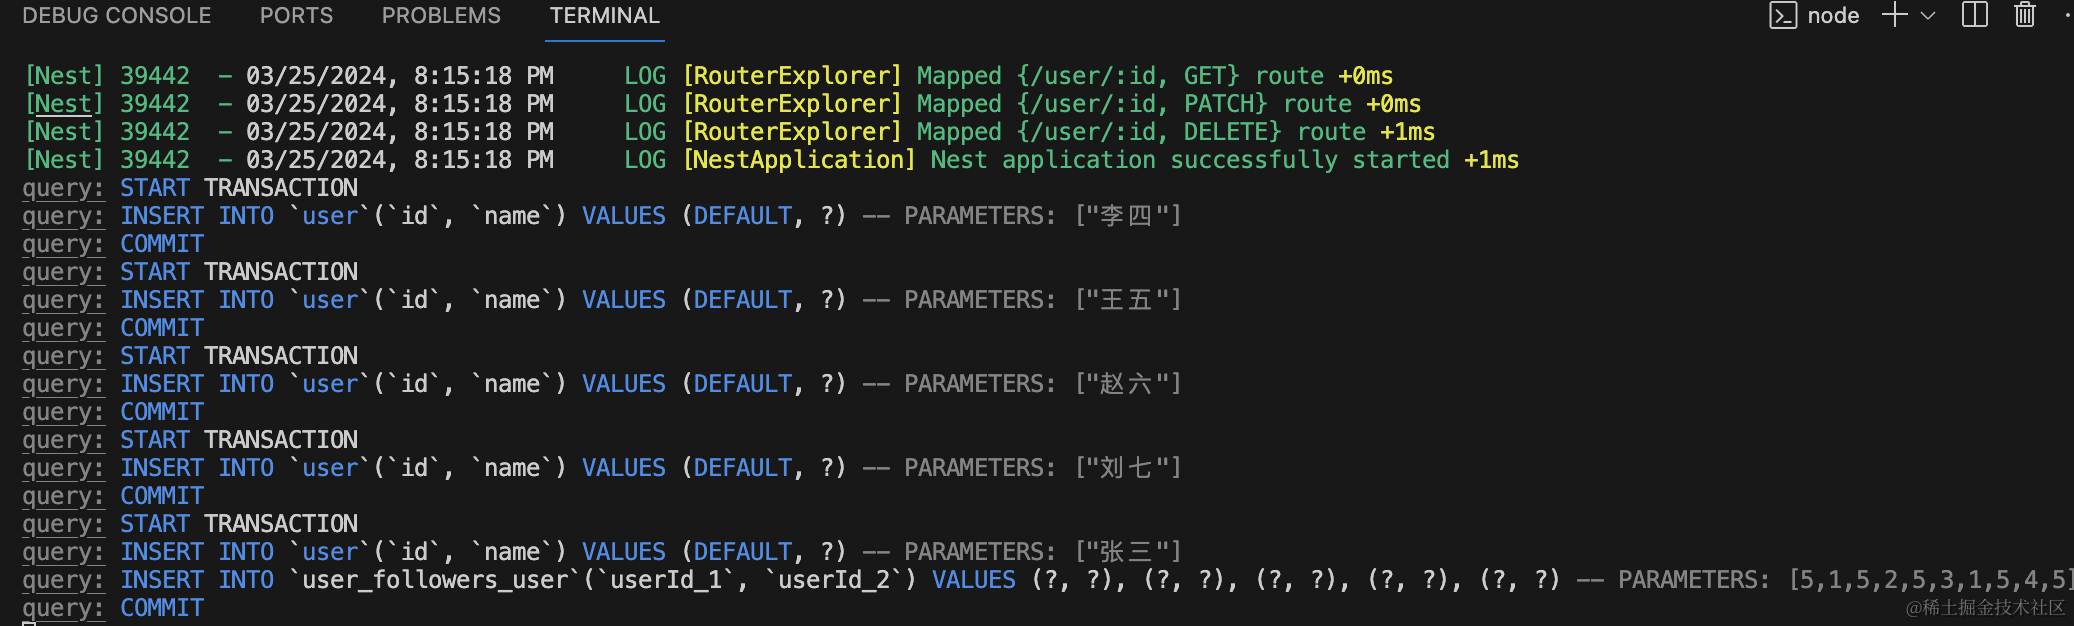
在 mysql workbench 里看下:
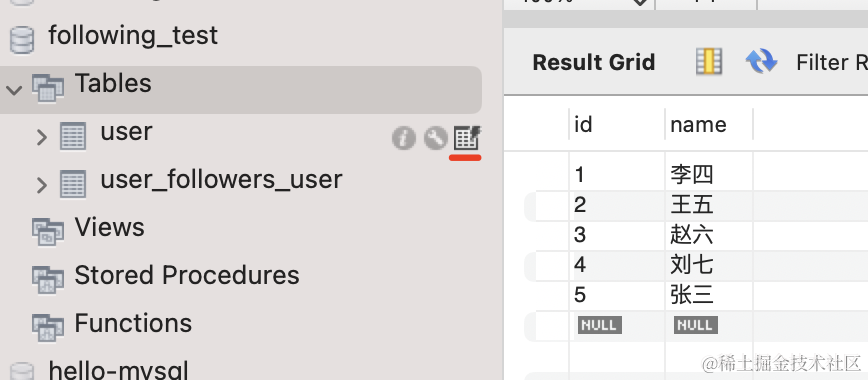
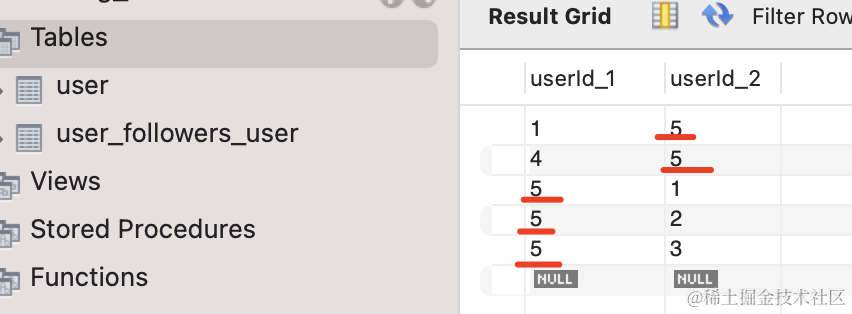
张三的 id 是 5,他的三个关注者李四、王五、赵六,他关注的人李四、刘七。
关系都保存下来了。
接下来实现相互关注功能,我们要引入 redis。
安装 redis 的包:
npm install --save redis
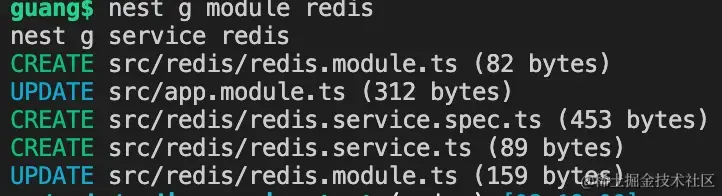
然后创建个 redis 模块:
nest g module redis
nest g service redis
在 RedisModule 创建连接 redis 的 provider,导出 RedisService,并把这个模块标记为 @Global 模块
import { Global, Module } from "@nestjs/common";
import { createClient } from "redis";
import { RedisService } from "./redis.service";

@Global()
@Module({
    providers: [
        RedisService,
        {
            provide: "REDIS_CLIENT",
            async useFactory() {
                const client = createClient({
                    socket: {
                        host: "localhost",
                        port: 6379,
                    },
                });
                await client.connect();
                return client;
            },
        },
    ],
    exports: [RedisService],
})
export class RedisModule {}
然后在 RedisService 里注入 REDIS_CLIENT,并封装一些方法:
import { Inject, Injectable } from "@nestjs/common";
import { RedisClientType } from "redis";

@Injectable()
export class RedisService {
    @Inject("REDIS_CLIENT")
    private redisClient: RedisClientType;

    async sAdd(key: string, ...members: string[]) {
        return this.redisClient.sAdd(key, members);
    }

    async sInterStore(newSetKey: string, set1: string, set2: string) {
        return this.redisClient.sInterStore(newSetKey, [set1, set2]);
    }

    async sIsMember(key: string, member: string) {
        return this.redisClient.sIsMember(key, member);
    }

    async sMember(key: string) {
        return this.redisClient.sMembers(key);
    }

    async exists(key: string) {
        const result = await this.redisClient.exists(key);
        return result > 0;
    }
}
封装 SADD、SINTERSTORE、SISMEMBER、SMEMBER 命令,分别用来往集合中添加元素,求两个集合的交集创建新集合,判断元素是否在某个集合中、返回集合中的所有元素。
还有 EXISTS 用来判断某个 key 是否存在,返回 1 代表存在,返回 0 代表不存在。
然后在 UserService 添加一个方法:
@Inject(RedisService)
redisService: RedisService;
async findUserByIds(userIds: string[] | number[]) {
let users = [];
for(let i = 0; i< userIds.length; i ++) {
const user = await this.entityManager.findOne(User, {
where: {
id: +userIds[i]
}
});
users.push(user);
}
return users;
}
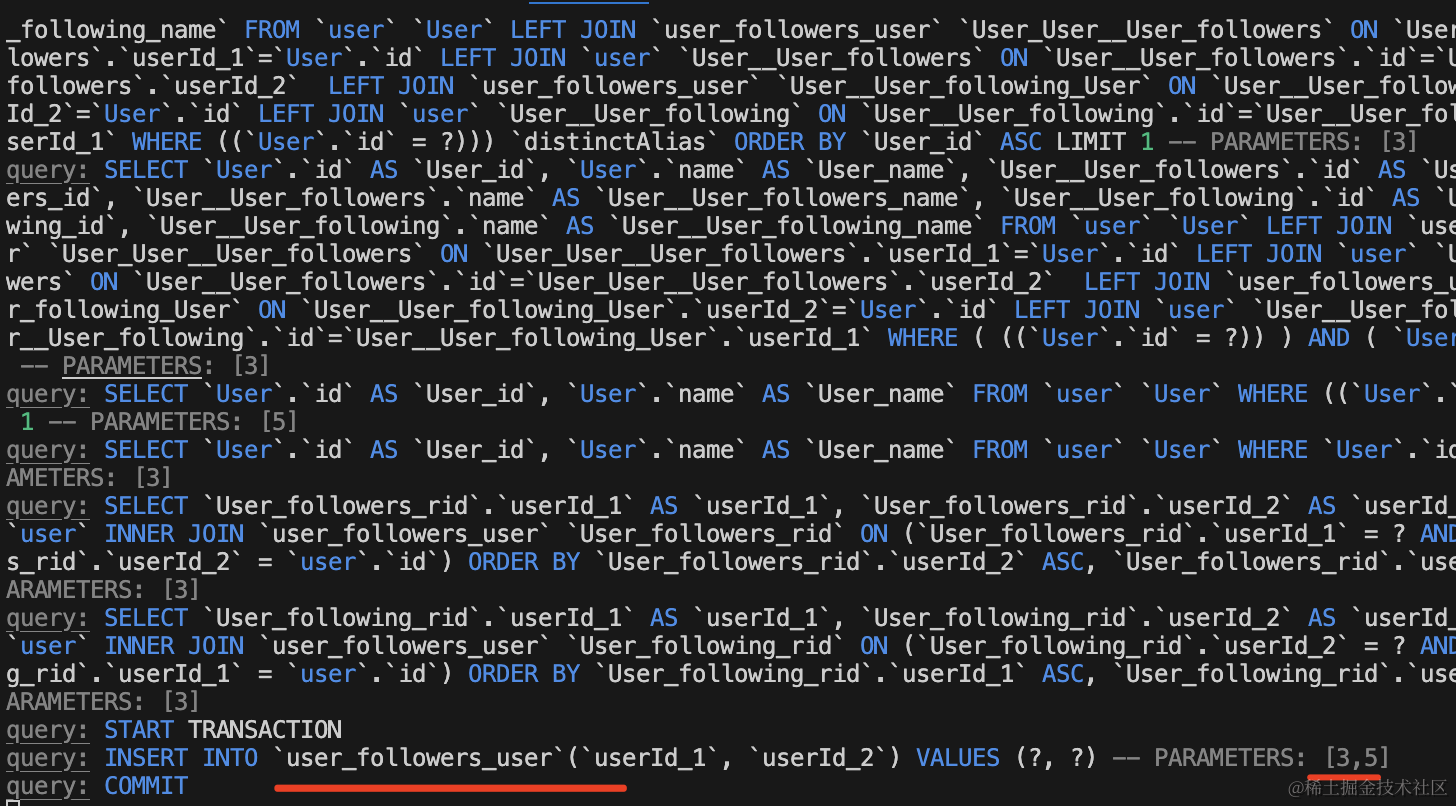
async getFollowRelationship(userId: number) {
const exists = await this.redisService.exists('followers:' + userId);
if(!exists) {
const user = await this.entityManager.findOne(User, {
where: {
id: userId
},
relations: ['followers', 'following']
});
if(!user.followers.length || !user.following.length) {
return {
followers: user.followers,
following: user.following,
followEachOther: []
}
}
await this.redisService.sAdd('followers:' + userId, ...user.followers.map(item => item.id.toString()));
await this.redisService.sAdd('following:' + userId, ...user.following.map(item => item.id.toString()))
await this.redisService.sInterStore('follow-each-other:' + userId, 'followers:' + userId, 'following:' + userId);
const followEachOtherIds = await this.redisService.sMember('follow-each-other:' + userId);
const followEachOtherUsers = await this.findUserByIds(followEachOtherIds);
return {
followers: user.followers,
following: user.following,
followEachOther: followEachOtherUsers
}
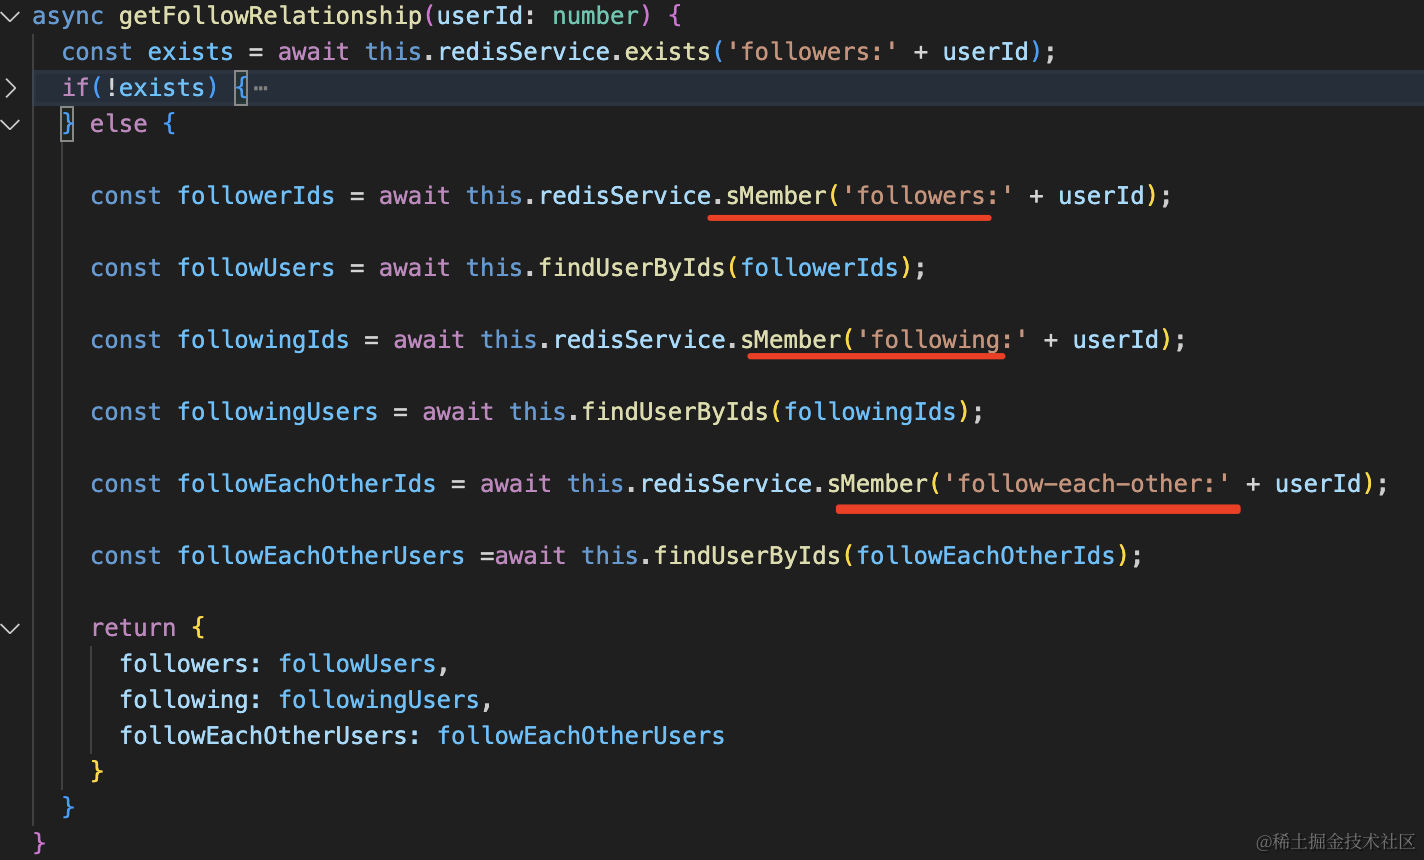
} else {
const followerIds = await this.redisService.sMember('followers:' + userId);
const followUsers = await this.findUserByIds(followerIds);
const followingIds = await this.redisService.sMember('following:' + userId);
const followingUsers = await this.findUserByIds(followingIds);
const followEachOtherIds = await this.redisService.sMember('follow-each-other:' + userId);
const followEachOtherUsers =await this.findUserByIds(followEachOtherIds);
return {
followers: followUsers,
following: followingUsers,
followEachOtherUsers: followEachOtherUsers
}
}
}
代码比较多,我们一部分一部分的看:

传入 userIds,查询对应的 User 信息返回。
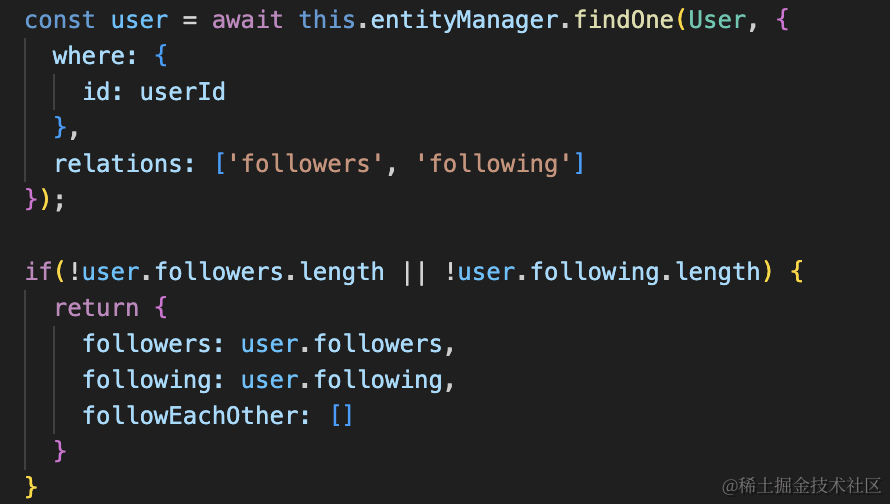
根据 id 查询用户的信息,关联查出 followers 和 following。
如果 follwers 或者 following 为空,那就没有互相关注,可以直接返回。
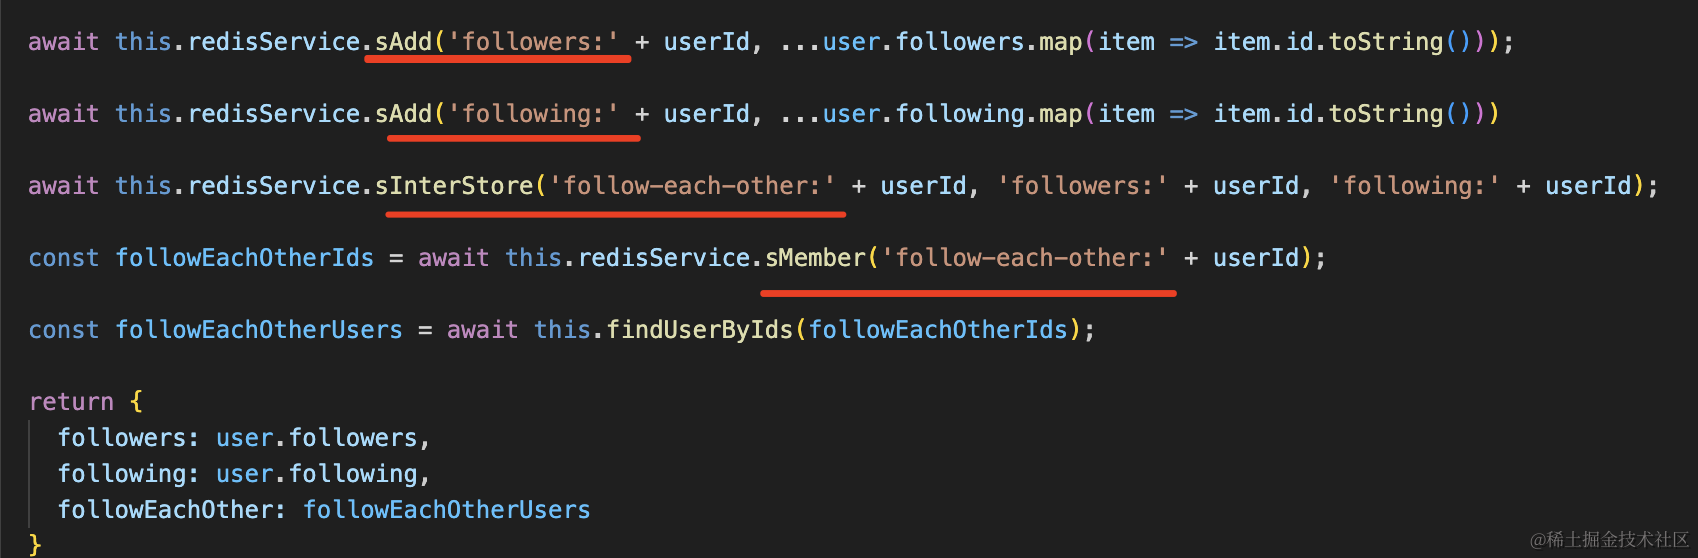
否则就分别把 follwers 和 follwing 的 id 用 SADD 添加到两个集合中。
之后求两个集合的交集,存入 follow-each-other:userId 的集合。
最后把 followers、following 还有求出来的相互关注的关系返回。
如果 exits 判断 followers 集合存在,就是处理过了,那就直接取 redis 里的这三个集合。
根据集合的 id 求出用户信息返回:
在 UserController 添加一个路由:
@Get('follow-relationship')
async followRelationShip(@Query('id') id: string) {
    if(!id) {
      throw new BadRequestException('userId 不能为空');
    }
    return this.userService.getFollowRelationship(+id);
}
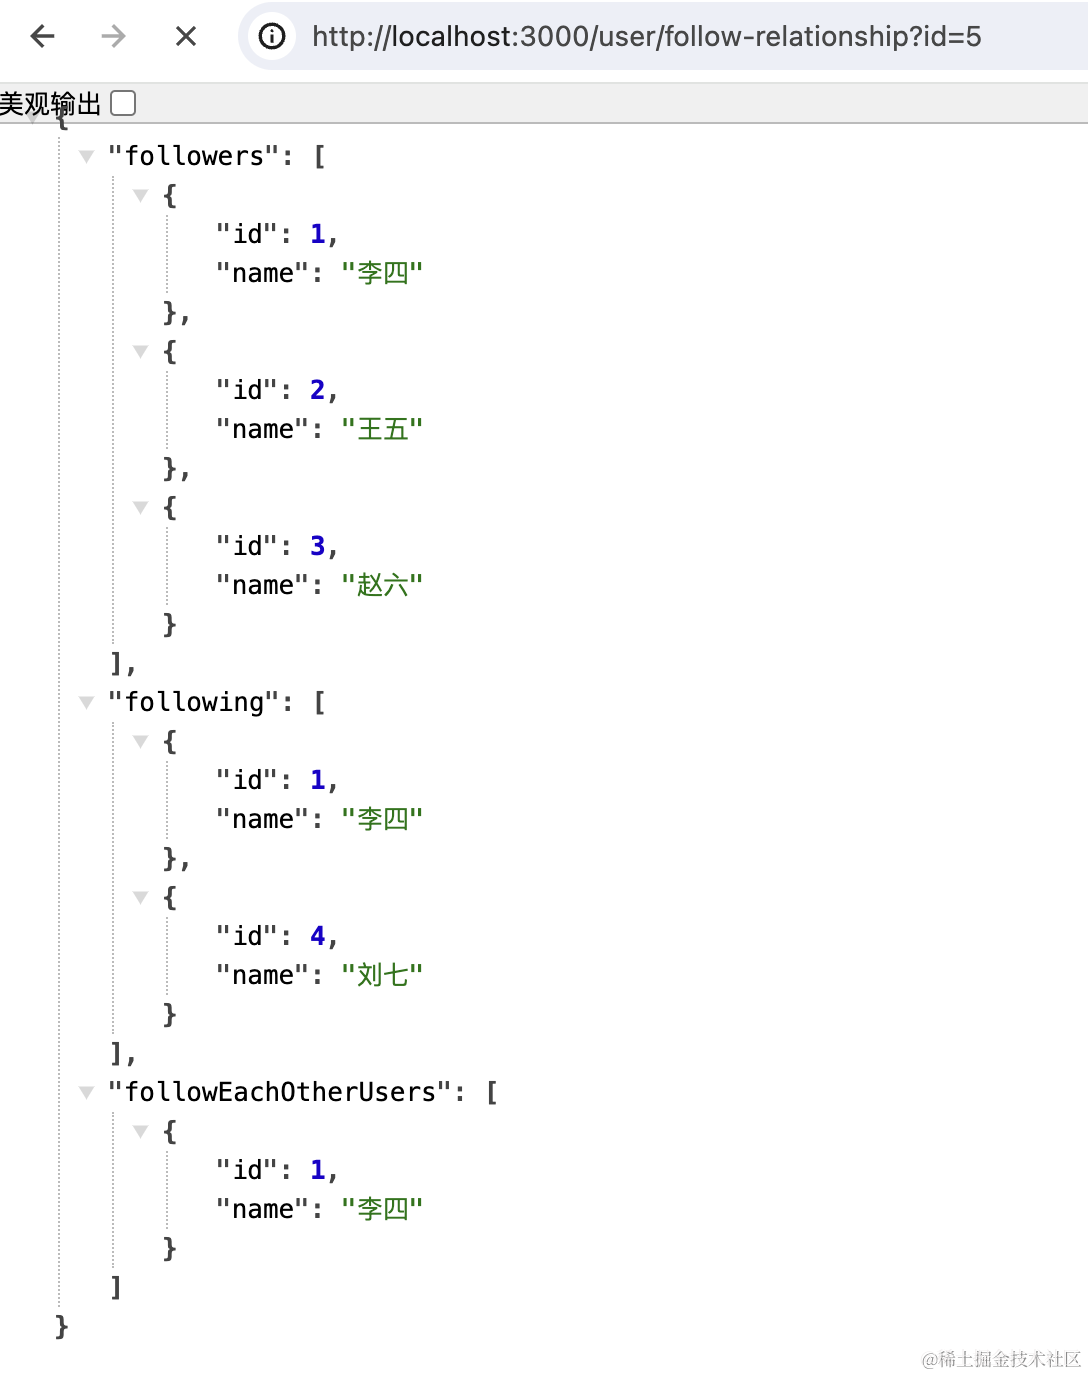
浏览器访问下:
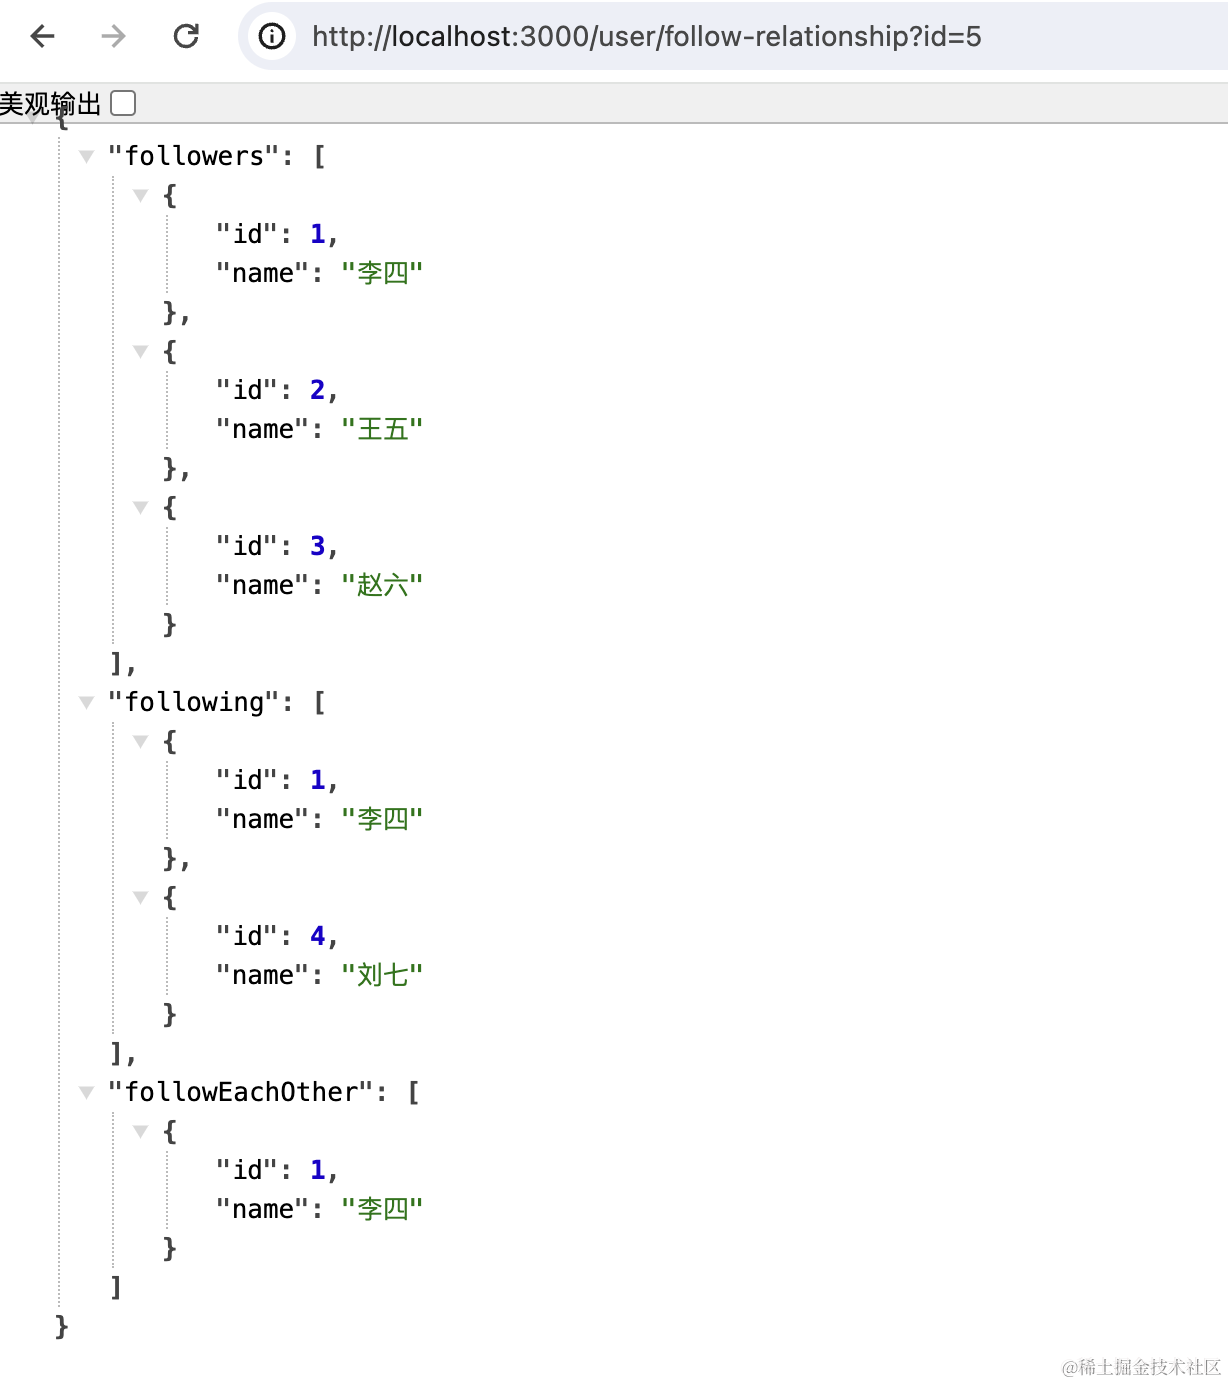
结果是正确的。
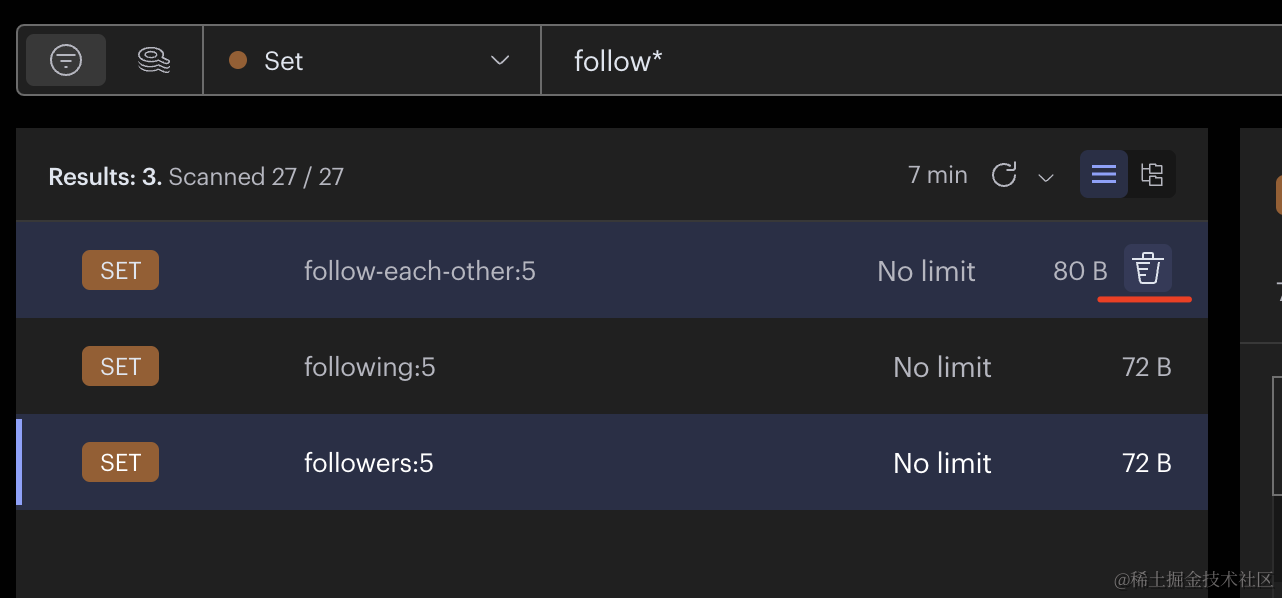
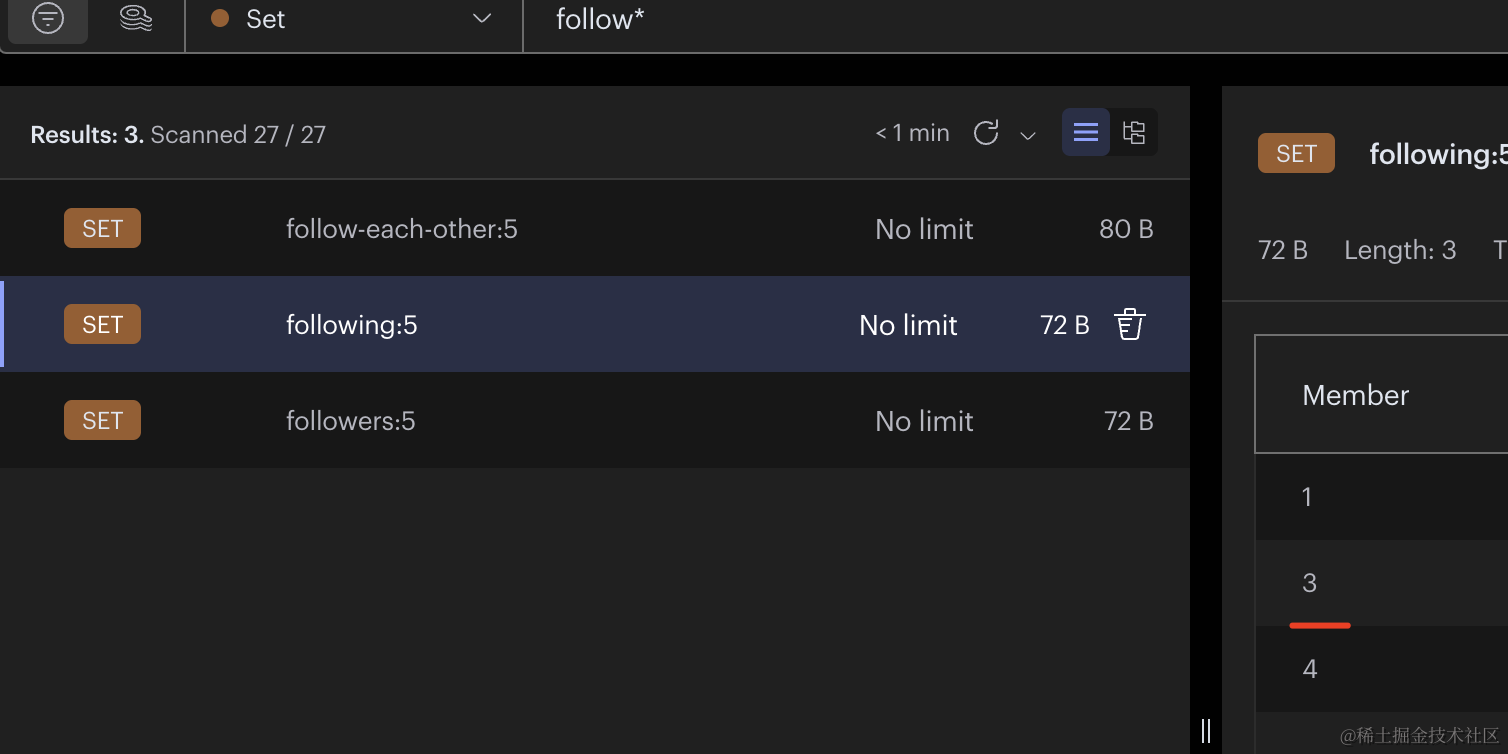
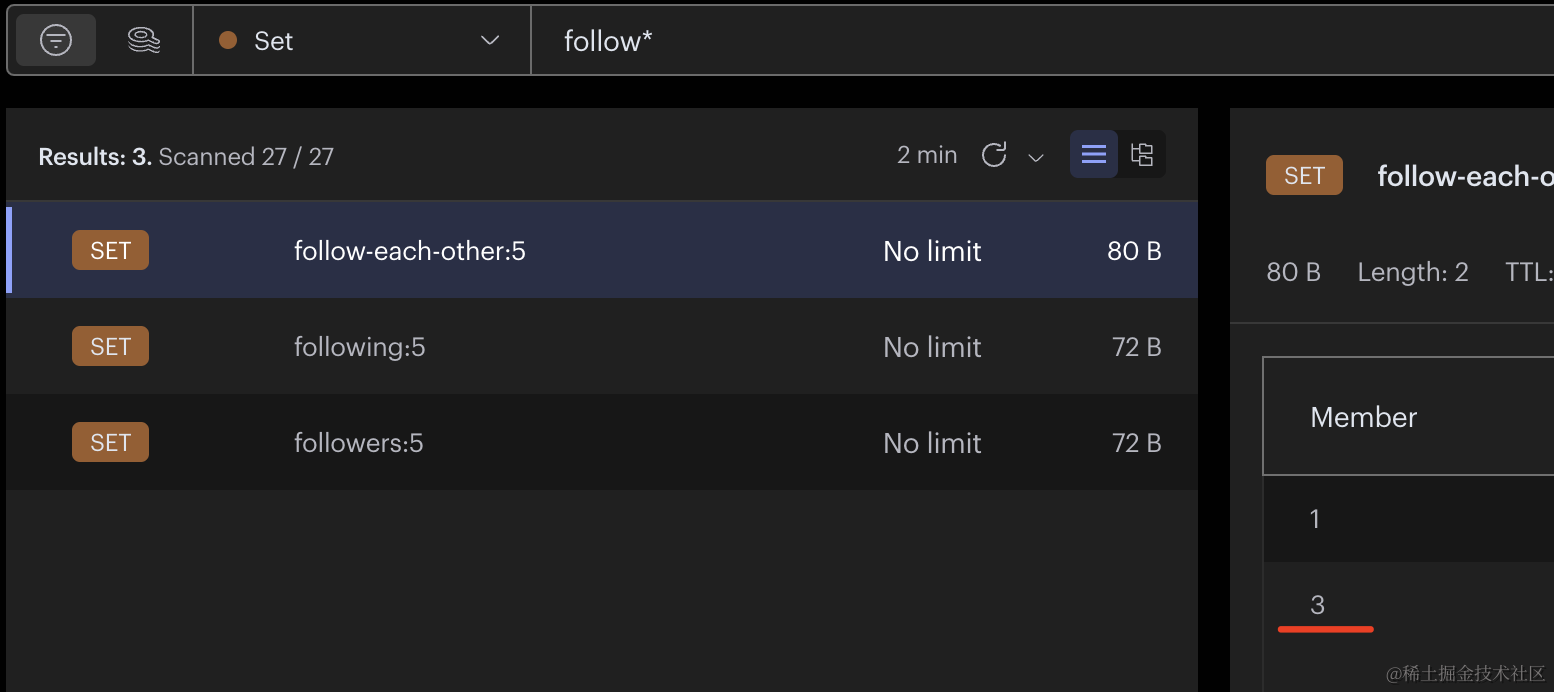
在 RedisInsight 里可以看到这三个 set:
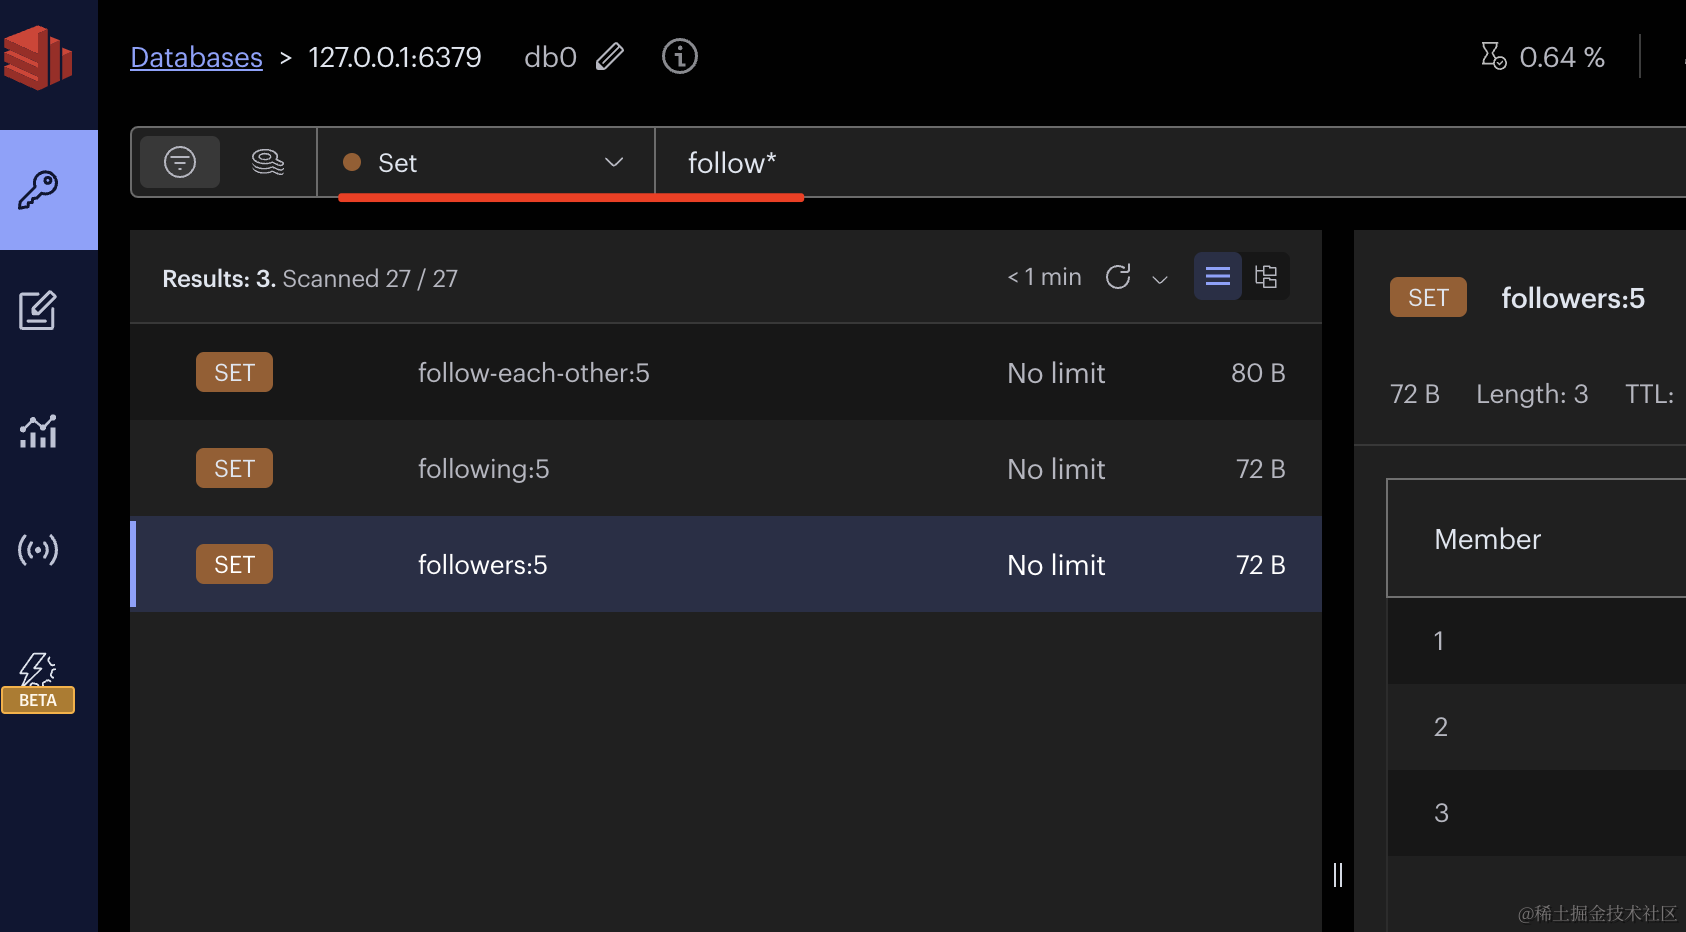
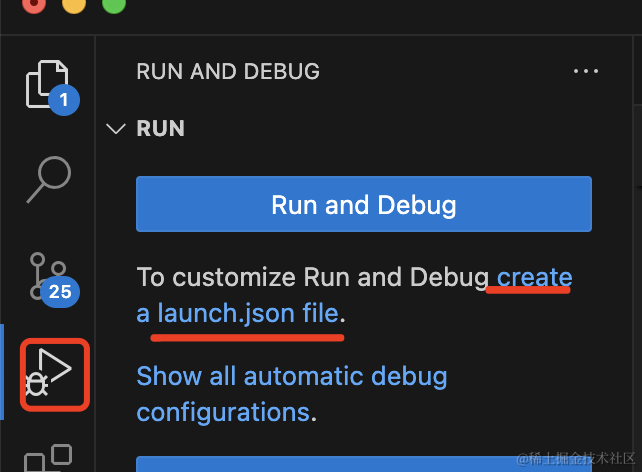
逻辑比较复杂,我们调试下。
点击 debug 面板的 create a launch.json file
{
    "version": "0.2.0",
    "configurations": [
        {
            "name": "debug nest",
            "request": "launch",
            "runtimeArgs": ["run", "start:dev"],
            "runtimeExecutable": "npm",
            "console": "integratedTerminal",
            "skipFiles": ["<node_internals>/**"],
            "type": "node"
        }
    ]
}
在代码里打两个断点:
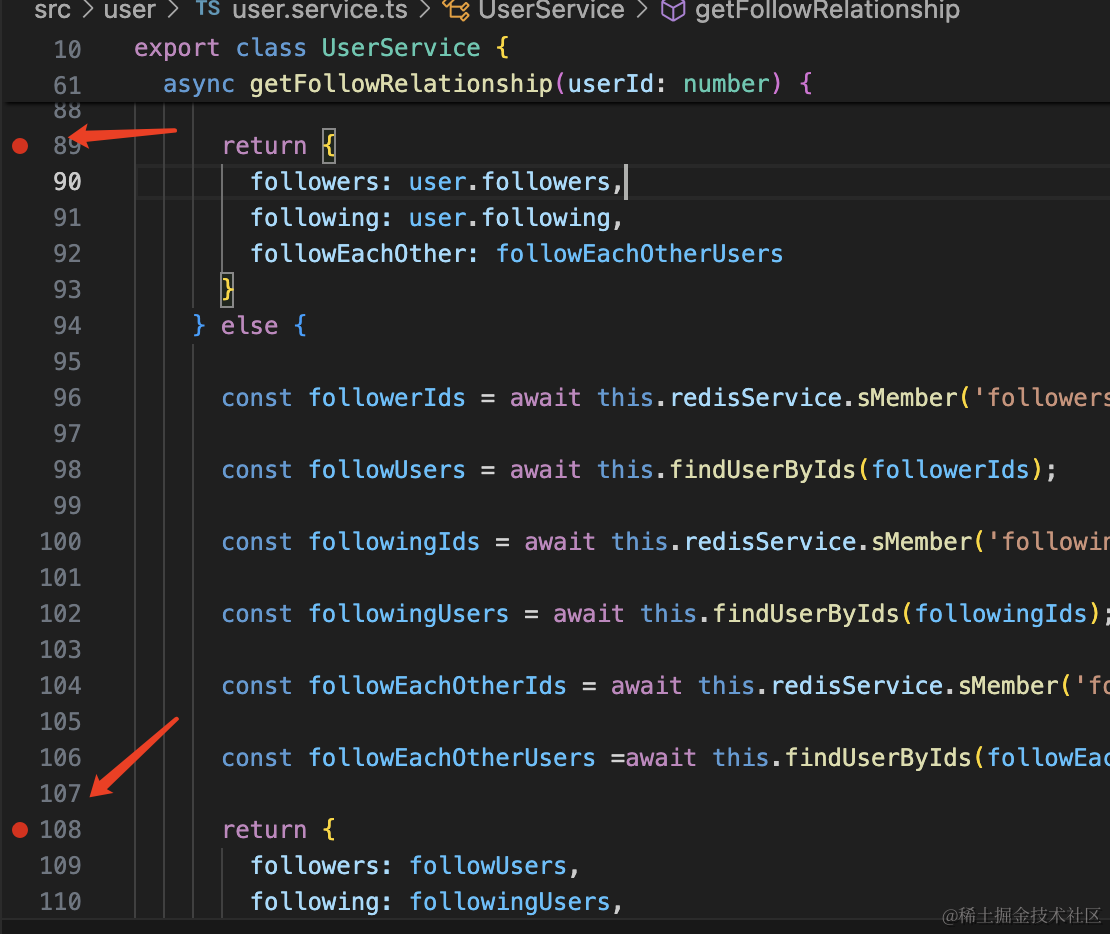
点击 debug 启动:
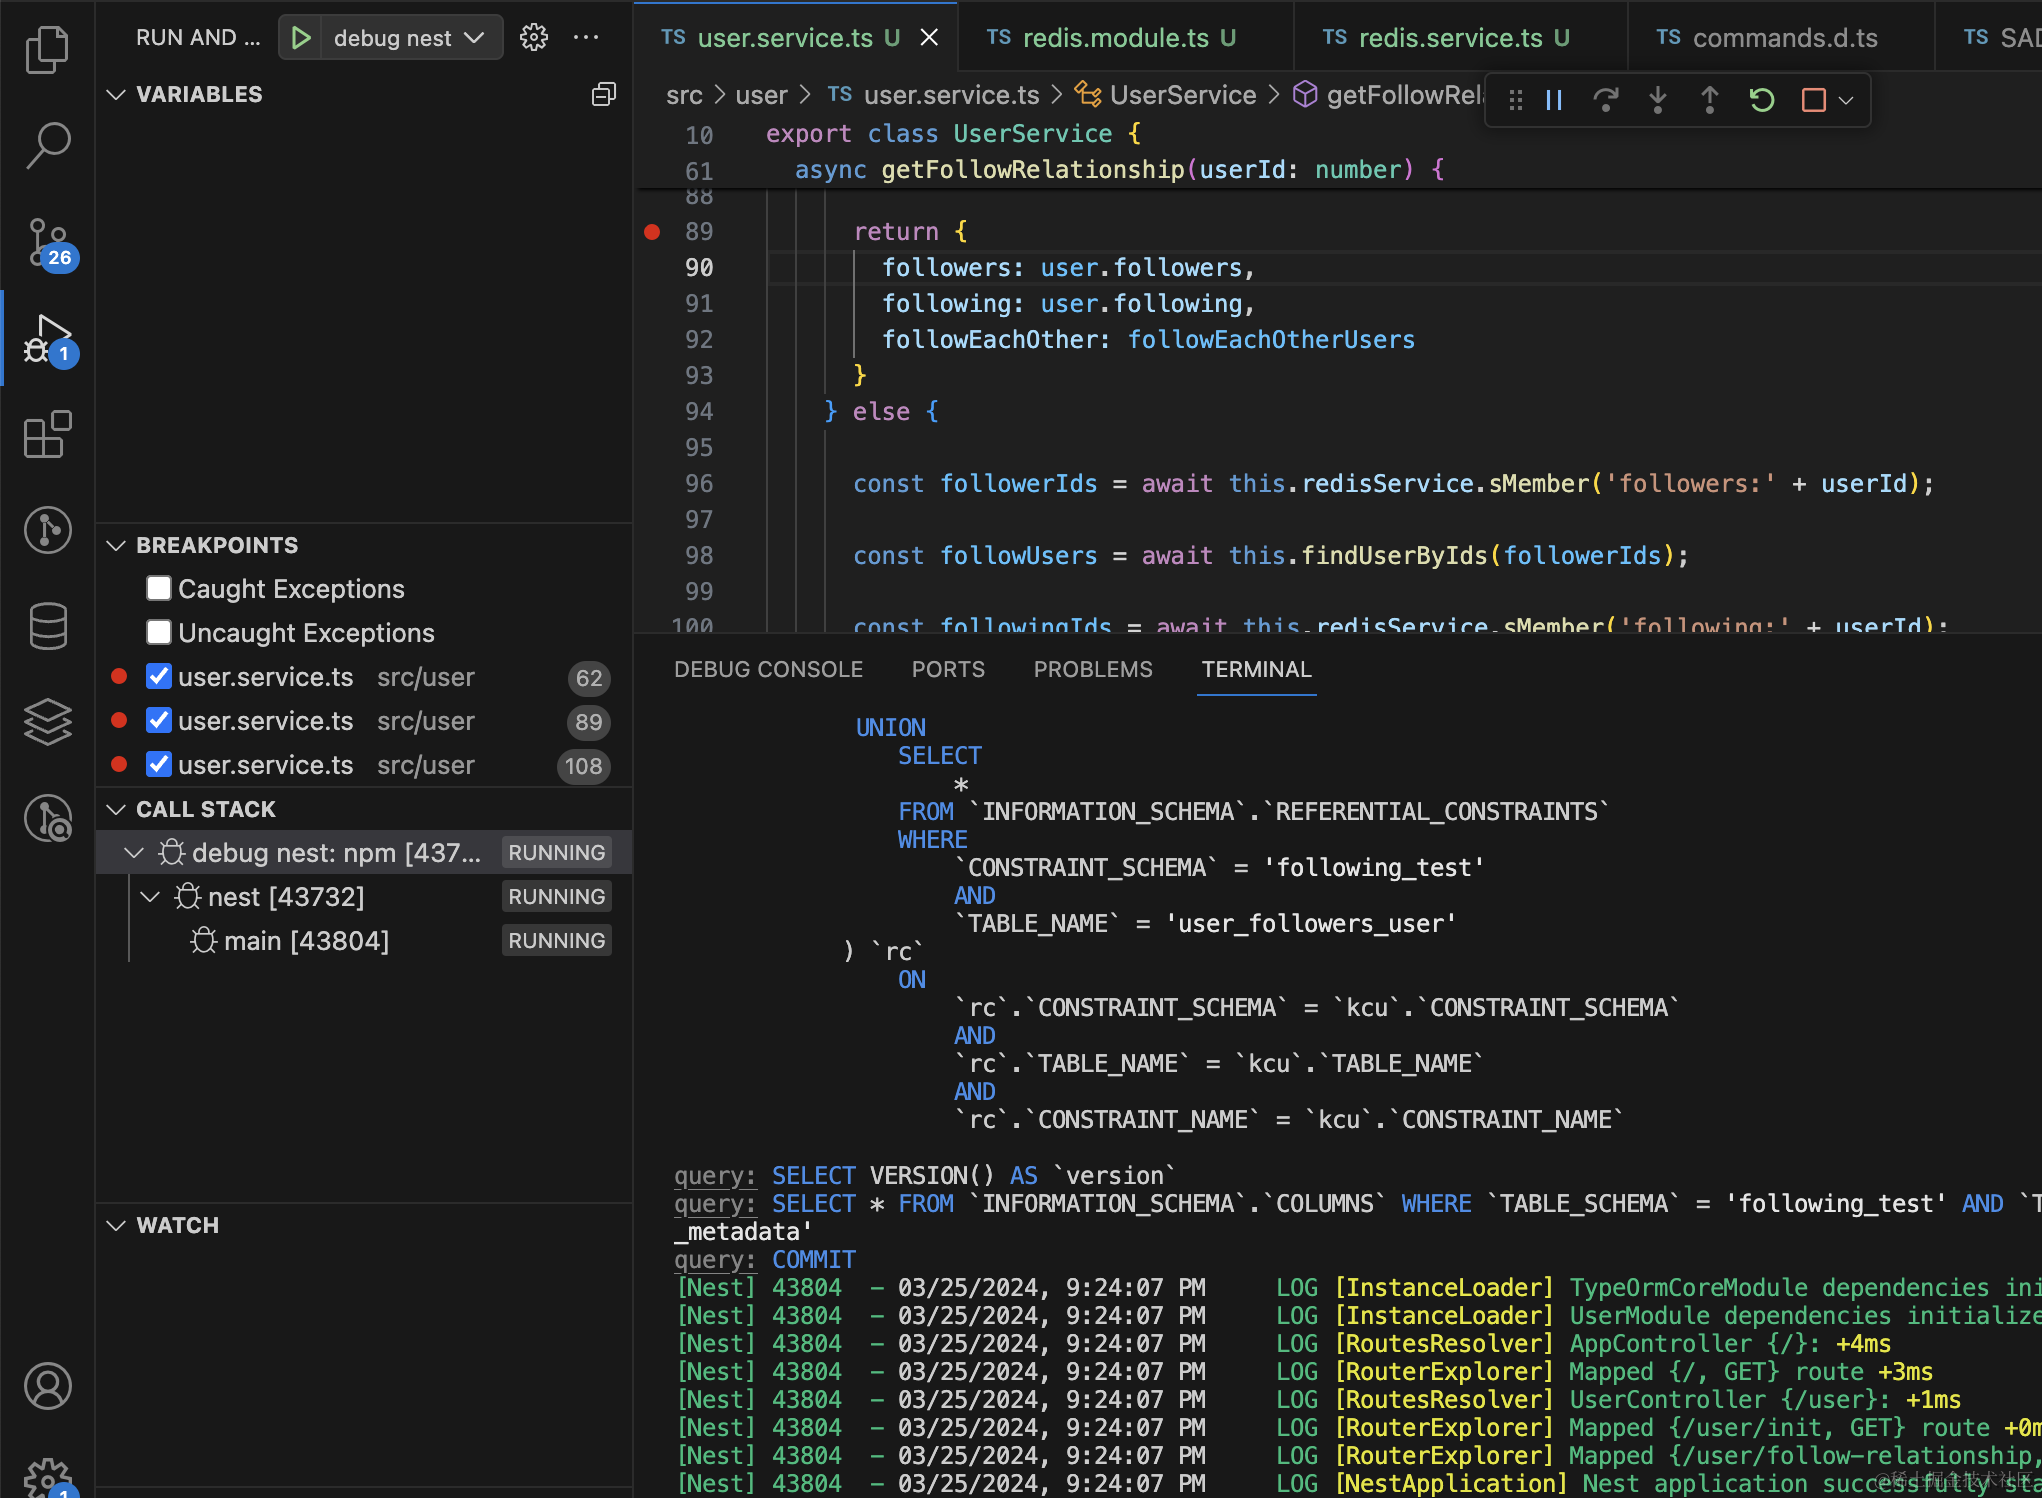
浏览器访问下:
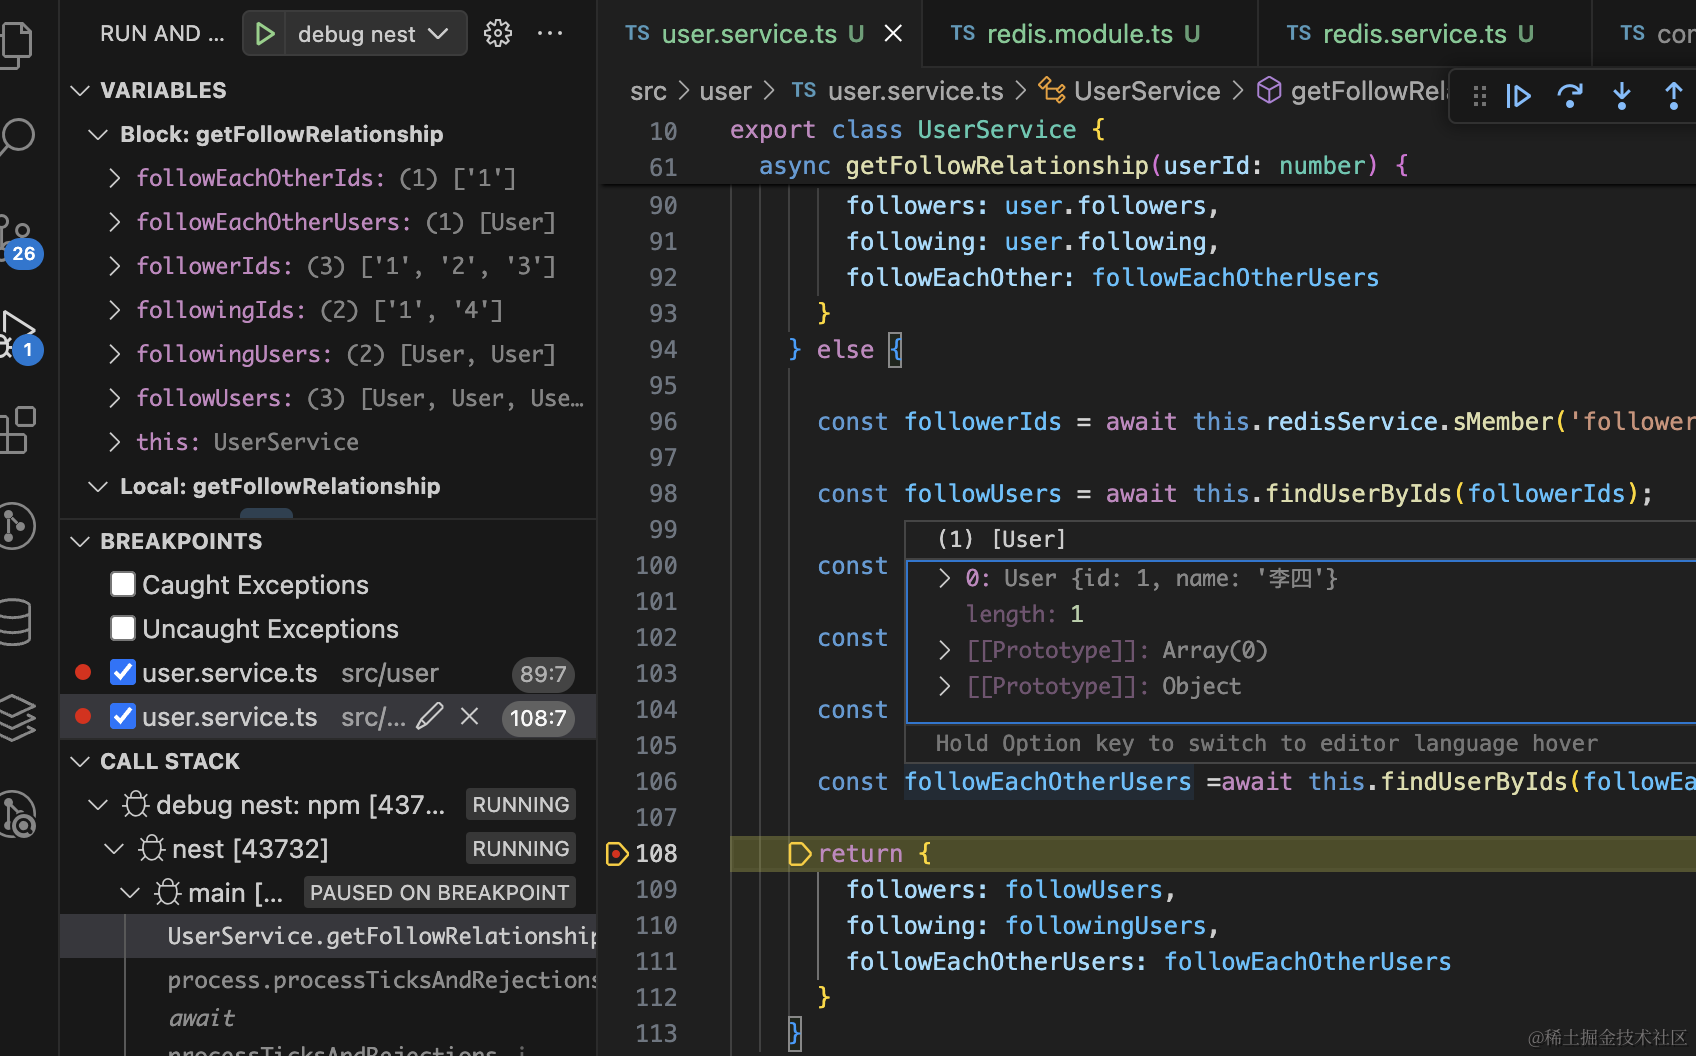
可以看到,它走到了 else 部分。
在 RedisInsight 里把这三个集合删掉:
再次访问:

这时候走的就是另一个分支了。
那如果有新的关注者呢?
比如张三又关注了 id 为 3 的赵六:
这时要更新下数据库,并且更新 redis 里的 follwing 和 follow-each-other 集合。
在 UserService 添加 follow 方法:
async follow(userId: number, userId2: number){
  const user = await this.entityManager.findOne(User, {
    where: {
      id: userId
    },
    relations: ['followers', 'following']
  });

  const user2 = await this.entityManager.findOne(User, {
    where: {
      id: userId2
    }
  });

  user.followers.push(user2);

  await this.entityManager.save(User, user);

  const exists = await this.redisService.exists('followers:' + userId);

  if(exists) {
    await this.redisService.sAdd('followers:' + userId, userId2.toString());
    await this.redisService.sInterStore('follow-each-other:' + userId, 'followers:' + userId, 'following:' + userId);
  }

 const exists2 = await this.redisService.exists('following:' + userId2);

 if(exists2) {
    await this.redisService.sAdd('following:' + userId2, userId.toString());
    await this.redisService.sInterStore('follow-each-other:' + userId2, 'followers:' + userId2, 'following:' + userId2);
  }
}
先查询出 user 的数据,在 followers 添加 user2,然后 save 保存到数据库。
之后查询下 redis,如果有 followers:userId 的 key,就更新下 followers 和 follow-each-other 集合。
这里 user1 和 user2 的集合都要查询并更新下。
然后在 UserController 里添加下路由:
@Get('follow')
async follow(@Query('id1') userId1: string, @Query('id2') userId2: string) {
    await this.userService.follow(+userId1, +userId2);
    return 'done';
}
浏览器访问下:
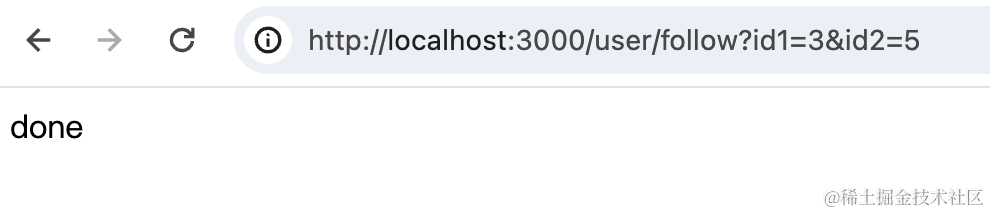
可以看到,数据库和 redis 都更新了:
再次查询下:
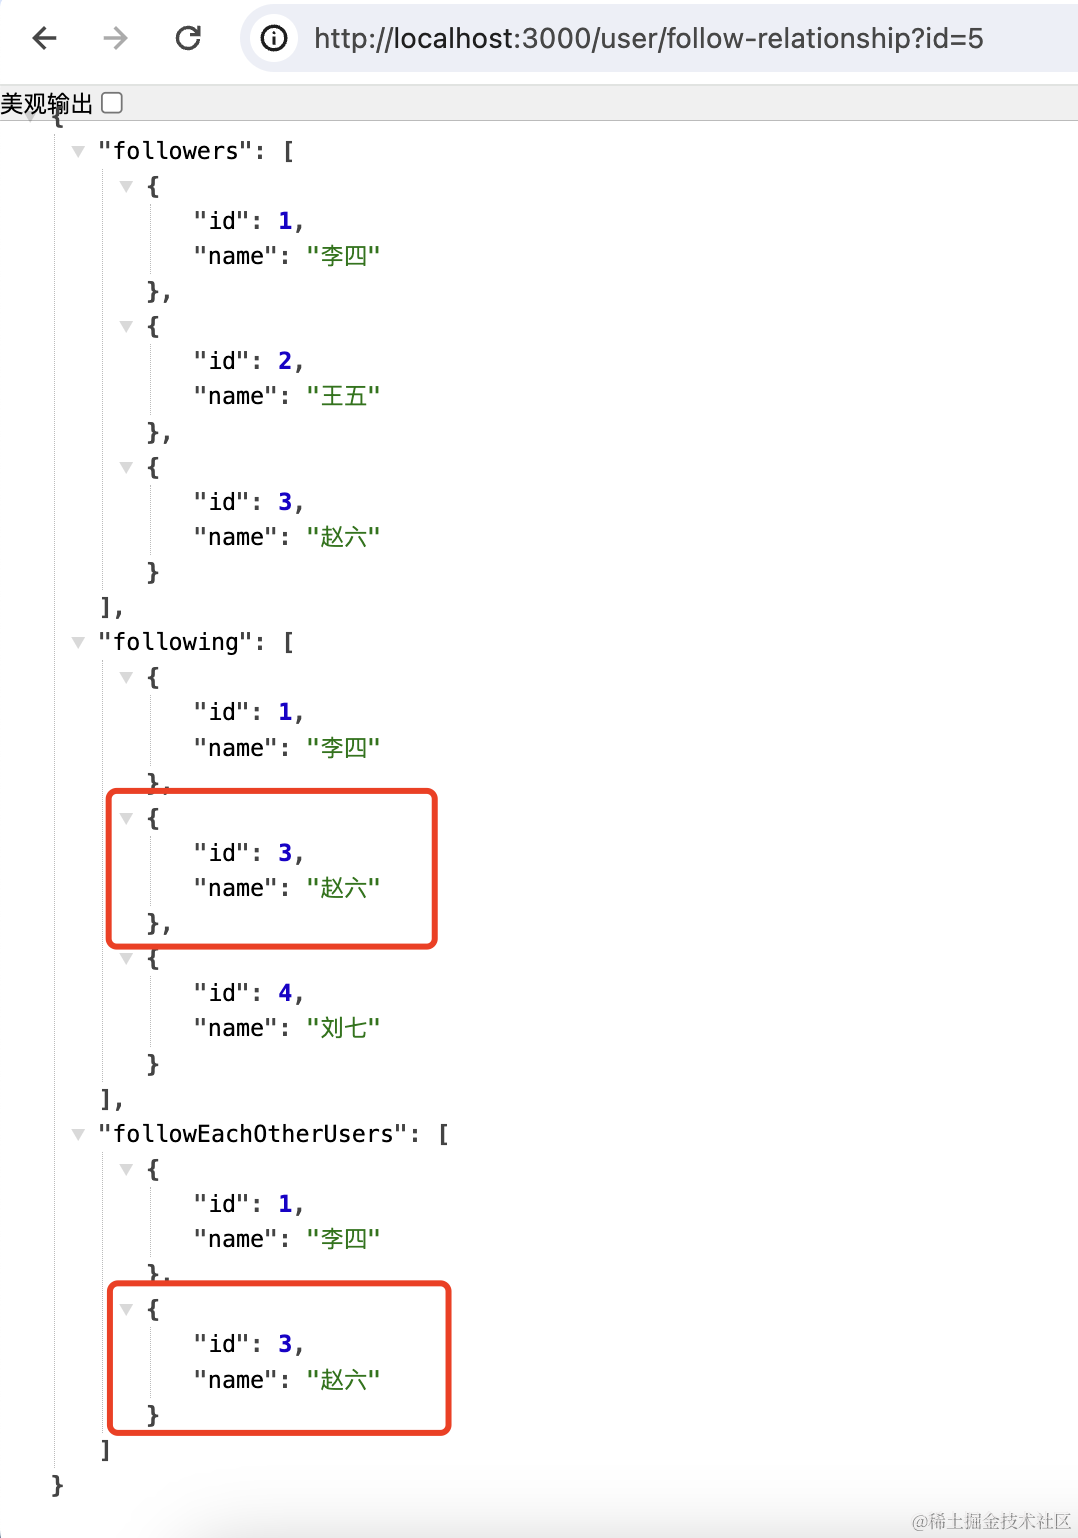
这样,相互关注的功能就实现了。
知乎、掘金这种关注关系都是这样实现的:


案例代码上传了小册仓库
总结
这节我们实现了下关注、被关注、互相关注。
在 mysql 里用中间表来存储 user 和 user 的关系,在 TypeORM 里用 @ManyToMany 映射。
互相关注用 redis 的 Set 来实现,先把 user 的 followers 和 following 存储到集合中。
然后把两个集合的交集求出来放入一个新的集合。
这样就能求出互相关注的关系。
当有新的关注或者取消关注时,除了要更新数据库外,也要顺便更新下 redis。
这样,查询互相关注关系的功能就完成了。